Thursday, June 23, 2011

Peach Bread

Best Blogger Tips
Immortalized by folklore's, traditions and signature dishes (like the Peach Melba), the peach is a perfect summer food. Every year this time when I come across numerous vendors on the roadside with their huge piles of peaches and other fruits, I long to take this tasty treat home and use it one way or another.
It's quite another story that I need to really wrestle with my elder son who loves to have peaches raw and ends up finishing them before I get a chance to use them in a souffle or cake. The thing with Peaches is that you cannot refrigerate them as they lose their sweetness (personal experience - may be wrong) and the Delhi heat blast spoils them if kept out for long. So a quick approach is vital especially with the shelf life as well as my elder ones love for them.
Last week I thought of baking a peach bread. I still haven't got to used to the name though. It has a different ring and it may take time to get used to the name, but I loved the taste - it was a welcome difference to the usual banana bread and the variations I have tried with it.
As the summer progresses, I am expecting more and more juicier ones to flood the market and cannot wait to have my hands on them.
The Peach bread was a big hit in the household and the orders have started to flood in. My parents go on their vacation day after and I need to bake them some peach bread for their journey. I travel with wife and kids next week to Naldehra for a week's getaway and am contemplating taking some peach bread with me for the journey. It is a good eight hour drive from Delhi to reach Naldehra which is some 20 odd kilometers away from Simla and apart from wife and kids, I have my good college buddy Abhineet and his wife and daughter for company, so with 3 absolutely noisy kids in the car, some tasty peach bread will go a long way in not only providing good taste but the necessary energy to drive their moms crazy with their antics.

Peach Bread

Ingredients:

Peaches, cut into dices - 2 Cups (around 3 peaches should do)
Peaches, pureed - 1/2 Cup ( Around 2 Peaches should do)
Biscuit Crumbs (Marie or other digestive ones) - 1/2 Cup
All Purpose Flour - 2.5 Cups
Baking Powder - 2 Tsp
Baking Soda - 1 Tsp
Cinnamon - 1/2 Tsp
Raisins - 20-30
Salt - 1/2 Tsp
Yogurt, hung - 1/2 Cup
Soft Butter - 1/4 Cup
Eggs- 3
Sugar - 1 Cup
Vanilla Essence - 1 Tsp
Method:
1. Mix the diced peaches with 1/4 cup of sugar and let it soak for atleast 30 minutes.
2. Mix all the dry ingredients, except the sugar, in a large bowl.
3. In a separate bowl combine butter & hung yogurt. Whisk till well blended. Add in the 3/4 cup sugar and whisk till the mixture is smooth and creamy.
4. Slowly add in the eggs, one at a time. Beat each egg completely before adding the next one.
5. Add in the pureed peaches and whisk well to combine.

6. Add in the raisins and diced peaches (soaked in 1/4 cup sugar) . Mix together.
7. Add in the flour mixture and gently stir to combine.
8. Pour into a loaf pan. Place in a pre-heated oven at 200 degrees Celsius and bake for 60 minutes or till a toothpick inserted in the middle comes out clean.
9. Remove from the oven and allow to rest for 10 minutes.
10. Remove from the loaf pan and cool on a wire rack. Cut and serve the slices.

Monday, June 20, 2011

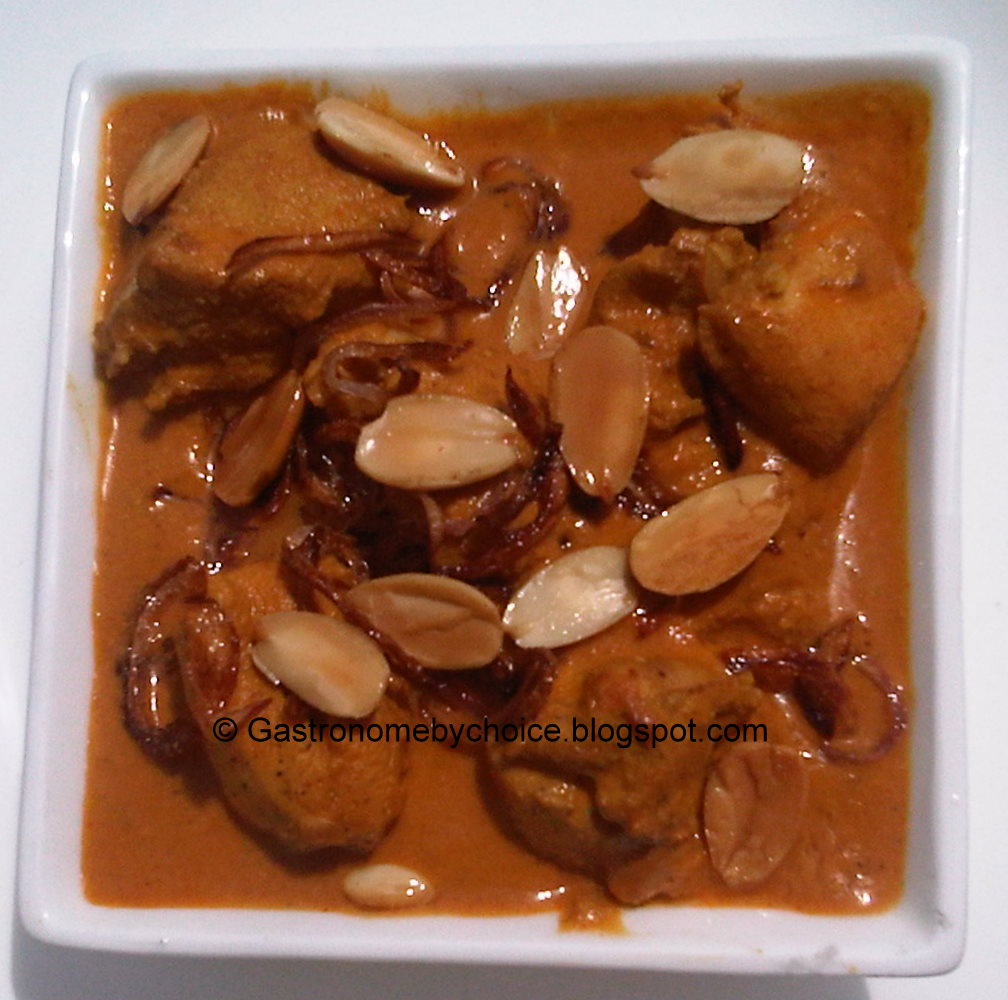
Badami Murg Masala (Chicken Curry in Almond Sauce)

Best Blogger Tips

After a subtly flavored and delicious cashew based chicken curry from down south, it was time for its northern cousin, the almond to make its presence known in a little spicy but rich North Indian gravy.
The almond is native to the Mediterranean region of the middle east and is extensively used globally in various cuisines lending itself to some tasty starters, delicious curries and mouth watering desserts.
Almonds have also been a part of the folklore, with gifting of five almonds during weddings represents health, wealth, long life, fertility and happiness. Then there is a Greek legend around this that young man called Demophon, who fell in love with a Tracian princess, Phyllis. Before the marriage ceremony Demophon is informed that his father has died in Athens and he must return for the funeral. He promises to come back by a certain day but does not return until three months have passed by. By this time Phyllis is sure that she will never see her lover, Demophon again and hangs herself. The Gods, touched by her love, transform her into an almond tree. The desperate Demophon goes to the almond tree and offers a sacrifice to the tree, declaring his undying love. In response to his gesture, the almond tree blossoms. Therefore the almond came to symbolize impetuous youth and immortal love.
Atleast in India, the common folk believe that eating almonds increases brain power. So it is not uncommon for people to remark to others (especially kids not doing too well in studies) to have almonds soaked overnight.
Now coming back to this recipe. You can try this variations. If you do not add tomatoes then this will become a Qorma (Korma). One can also add paste of roasted grated coconut to the dish and if you have time on your hands, try covering the dish during the later stages and sealing it with some dough to do a Dum.

Other Indian chicken recipes on this blog that are worth trying are:

Murg Handi Lazeez
Murg Malaaiwala
Chettinaad Kozhi Kozhambu
Murg Dahi Dhania Korma
Murg Peshawari
Murg Navratan
Murg Patiala
Murg Korma
Butter Chicken
Hyderabadi Anjeer Murgh
Murgh Kairi
Cashew Chicken Curry

Badami Murgh Masala

Ingredients:
Chicken Breasts, Boneless, cut into 1-Inch dices - 4
Onions, finely chopped - 3
Onion, finely sliced - 1
Ginger, finely chopped - 3 Tblsp
Garlic, finely chopped - 8 cloves
Fenugreek seeds - 1 tsp
Cumin seeds - 1 tsp
Cloves - 4
Coriander Powder - 1 Tsp
Turmeric Powder - 1 Tsp
Red Chili Powder - 2 Tsp
Garam Masala Powder - 1 Tsp
Green Cardamom -3
Black Cardamom - 1
Yogurt - 1 Cup
Almonds, ground into paste with 1/2 cup water - 20
Tomatoes, chopped - 3
Almonds, blanched and slivered - 8
Salt - To Taste
Black Pepper Powder - 2 Tsp
Lime Juice - 2 Tsp
Kewra - few drops
Oil - For frying and cooking

Method:
1. Marinate the chicken pieces with salt, black pepper powder and lime juice for 30 minutes.
2. Fry the onion slices till golden brown. Drain and keep aside.
3. In same oil fry the slivered almond pieces till they start to turn golden. Drain and keep aside.
4. In the same oil, add the chopped onions and fry till they start to turn golden.
5. Add in the ginger and garlic and cook for 2-3 minutes.
6. Add in the spices (fenugreek seeds, cumin seeds, cloves, green & black cardamom, turmeric, coriander, red chili and garam masala powder). Fry for 2 more minutes.
7. Add in the tomatoes and cook for 4-5 minutes.
8. Take off the flame and allow to cool. Blend the mixture in a food processor and strain into a clean cooking vessel. Return back to the flame.
9. Add in the chicken pieces and stir well so as to coat the chicken pieces with the mixture.
10. Cook for 15-20 minutes or until chicken pieces are tender.
11. Add in the almond paste and mix well. Simmer for 5 minutes.
12. Add in the beaten yogurt and mix well. Simmer for an additional 5 minutes.
13. Cook till the gravy has a saucy consistency and adjust seasonings. Add in the crushed fried onion slices and kewra.
14. Pour into a serving dish and garnish with some of the fried onion slices and almond slivers.
15. Serve hot.

Friday, June 10, 2011

Cashew Chicken Curry

Best Blogger Tips
I came across this simple yet "Hatke" (different) chicken recipe sometime back. According to a friend who passed this on, this is a simple subtle chicken dish from down south, Kerala, to be more precise. This creamy, subtly spiced and rich dish is easy to make and as experience taught me, was a big hit with the kids, who despise the usual spicy fare.
The cashew is another example of the all accommodating India. It was not native to India and was bought to India by the Portuguese (from Brazil) in the mid 16th century and is now used extensively in Indian cuisines, lending creaminess to many shahi kormas and who can forget the "Kaju Katli", the sweet preferred by many over the usual barfi and ladoos.
Though I'm sure this curry, without the tempering at the end, will go very well as a pasta sauce too, I'm also seriously contemplating making a pie with this as a filling. But that, is for another post.

Cashew Chicken Curry
Ingredients:

Chicken breasts, cut into 1 inch pieces - 6
Salt - 1 Tsp
White Pepper - 1 Tsp
Cashews, soaked for 2 hours and drained - 2 cups
Onions, chopped - 2
Green Chillies, chopped - 2
Garlic - 8 cloves
Ginger, chopped - 3 Tblsp
Green Cardamom - 2
Cloves - 4
Cinnamon Stick - 1 (1 inch)
Yogurt - 1 Cup
Mustard Seeds - 1/2 Tsp
Curry Leaves - 6
Cashewnuts, cut into halves - 6
Red Chillies - 2
Salt - To Taste
Oil - 3 Tblsp

Method:
1. Dry roast the Cinnamon stick, cardamom pods and cloves slightly and grind to a powder.
2. Grind the 2 cups of cashews with onions, garlic, ginger and green chillies into a fine paste. Add 1/4 to 1/2 cup water before grinding to achieve a pasty consistency.
3. Sprinkle the chicken pieces with salt and white pepper. Fry the chicken pieces with 2 Tblsp of oil until seared. Do not brown the chicken pieces as it will change the gravy colour.
4. Lower the heat and add the cashew paste. Stir fry for a couple of minutes till the paste and chicken have combined.
5. Take the skillet off the flame and gradually add the yogurt while stirring continuously. Return to flame and keep stirring to combine. Cook till oil rises to top (3-4 Minutes).
6. Add in the ground spice powder and mix well. Cover with a lid and cook for 10 more minutes on medium flame. Add in water if required.
7. Adjust the seasoning and transfer the sauce and gravy to a serving dish.
8. In a small pan, heat 1 tsp of oil and add in the mustard seeds. As the seeds start to crackle, add in the cashew halves and fry till they start to turn brown. Add the curry leaves and red chillies. remove from flame and pour over the chicken dish. Do not stir to mix.
9. Serve hot with rice, malabari paranthas or appams.

Sunday, February 27, 2011

Street Foods of India - Ram Ladoo (Delhi)

Best Blogger Tips
Come winters in Delhi and a very different foodie tends to emerge. One that longs for a nice mid morning drive to pick up some Chhole Bhature, get it packed and rush home so that all can have a heavy brunch. Or, some hot aloo tikki in the evenings at the roadside chaat shop. Parties tend to get lively around the grill, with hot tikkas and kababs coming straight off it onto the waiting plates. I long for getting my share of ram ladoos during winters, and my perfect haunt for getting them - Lajpat Nagar market. Garnished with some freshly grated radish and generous helpings of coriander-mint-green chili chutney, they make for the perfect roadside snack for me.
I don't know why they are called Ram Ladoo. Some even call them Gulgullas, but these moong dal dumplings somehow take you back to the old world Delhi, when little money could buy you a good lavish evening, weekends were spent with people and not TV sets, life was far less complicated and snacks like these were the McBurgers for us.
Ram Ladoo

Ingredients:
Moong Dal, washed - 200 gm
Chana Dal - 100 gm
Soda BiCarb - 1 Tsp
Salt - To Taste
Green Chillies, finely chopped - 1
Oil - For Deep frying
Radish, peeled & grated
Cilantro, finely chopped

Method:
1. Wash the dals and soak the dals in water separately for 6 hours alongwith soda bicarb.
2. Drain the water and coarsely grind the dals without any addition of extra water. Note : Do not grind the dal to a smooth paste else the batter will not form into ladoos.
3. Add in salt and finely chopped green chillies. Beat the mixture till it gets a light and frothy.
Note: To check doneness of consistency required, drop a small ball of batter into a bowl of water. If it rises to the surface it is done, else, get back to beating it more.
4. Heat oil in a wok till it gets hot.
5. Using wet finger Lift a small amount of batter and drop into the hot oil. Fry till golden.
6. Remove from wok onto paper napkins to drain excess oil. Repeat till al batter is used or you have fried the ram ladoos required.
7. To Assemble : Put 2 ladoos in a bowl and top with grated radish, mint chutney and some chopped cilantro. (P.S. : I have added less of the chutney. Usually it is flooded with the chutney :) )

Sunday, January 16, 2011

A Short Chennai Foodie Trail

Best Blogger Tips
Just came back from a 4 day trip to Chennai. It was a good escape from the severe cold wave in Delhi. 30 degrees temperature during day was a welcome change for the entire family. Though it was to celebrate the 60th Brithday celebrations of my father-in-law, I took the time out to check some of the foodie scene out in Chennai. Any foodie going to Chennai has atleast one agenda on the mind - Chettinad cuisine. Chettinad cuisine is the cuisine of the Nattukottai Chettiar community from the chettinad region of Tamil Nadu. The Chettinad is the region of the Sivaganga district of southern Tamil Nadu with Karaikudi as it's capital. The nattukottai chettiars are principally a trading community. The best places to sample Chettinad cuisine in Chennai are as follows (in no particular order):
- Karaikudi
- Ponnusami
- Anjappar
All the 3 mentioned above are chains of restaurants spread across the city and you can find one of these in your vicinity. We did not get to go to Ponnusami as the word was that the food is very spicy there. Maybe when I'm down next time, I'll give it a try. Karaikudi and Anjappar were good restaurants with plenty of North Indian option like Butter Chicken and Tikkas on their menu. The surprise item was that both had an extensive Chettinad menu featuring Rabbit and Turkey among an exhaustive seafood list. The prices are also very cheap. Despite ordering 10-12 items our bill did not go above Rs. 850 (inclusive of all taxes and service charge), and yes our orders did include Crab also. The Crab Masala and Ceylon Parotta in Anjappar is a must try.
Apart from Chettinad cuisine, it is a must for all travellers to go try the Tiffin at the Saravana Bhavan. Though now you have Saravana Bhavan branches all across the country, and I have been to the one in Delhi, the real enjoyment is had having the tiffin at Saravana Bhavan in Chennai. The Paper roast masala dosa and Medu Vada are a must try.
If you wish to indulge in other cusiines apart from Indian food, Chennai some amazing restaurants, one of which is Benjarong, offering authentic Thai Cuisine. Now Thai cuisine is my favorite cuisine apart from Japanese when I go dining out, and this restaurant served some of the best Thai that I have eaten in a very long time. The only drawback in this fine dining establishment is that they do not serve alcohol.
Burmese cuisine too finds it's place with eateries like Mingala, on Flowers road. The Mohinga out there was decent, though the menu is very limited.
Since this was a very short trip and made even shorter by the religous engagements, I may have missed out on quite a few foodie mecca's of Chennai. You may want to drop in a line, if you feel there are some that I missed out on, and I promise to visit them on my next visit, which may be a little sooner in the near future

Tuesday, January 4, 2011

Lemon & Red Chili Chutney

Best Blogger Tips
Let me begin by wishing everyone a very happy new year. After a very long hiatus, due to work and family commitments, I finally put up a post on this blog. So whoever, thought this blog was dead, will need to wait some more. As a resolution, I plan to devote more time to this blog. So 2011 will see changes in its look and contents as we coast along experiencing this new year.
The current post is a small recipe for a fiery chutney (relish) that goes well with chips or some subtle croquettes. My spouse and I encountered some nice fresh chillies at the local once-a-week 'mandi' (Indian word for market) and we bought loads of them. Now that we had them, we wondered what to do with them apart from the usual Red Chili Pickle which everyone seems to be doing with chillies in Delhi at this time of the year. Thus was born this tasty yet hot relish that we seem to match with every started these days.


Lemon & Red Chili Chutney

Ingredients

Lemons - 4 No.s
Red Chillies - 16 No.s
Garlic - 2 Cloves
Sugar / Honey - 3 Tblsp.
Olive Oil - 4 Tblsp
Mustard Powder, lightly crushed - 2 Tblsp
Vinegar - 2 Tblsp.
Turmeric Powder - 1 Tsp
Black Pepper, freshly ground - 2 Tblsp
Salt - To Taste

Method:
1. Cut the lemons into small pieces and put them in a blender.
2. Chop the chillies into little pieces and add with lemons in blender.
3. Add in all remaining ingredients in the blender. Mix well.
4. Blend this mixture till it is coarse. If you want it fine blend more.
5. Check seasoning. Refrigerate.

Serves - 30 People.

Tuesday, July 6, 2010

Mango Rasam

Best Blogger Tips
I had my in-laws over a couple of weeks back, and this time my grand mother-in-law was also visiting and staying over for a day. This is those times when my kitchen undergoes a total makeover of sorts. Being from Chennai, you can smell some strong Iyer kitchen aromas emanating around the house. All kind of delicacies will be made to feed my poor better half who has been (per them) starving for some good food ( read non-punju food ).

With the culinary demonstration in full flow, usually I try my best to make some punju food but typically give in to showcasing my own skills in making some good south indian fare.

This time around it was Mango Rasam. A month ago when they came it was apple rasam. You may ask why the rasam (Purists, may say why spoil by adding fruit - to which I say, that's me). Well, Rasam is not as easy as it sounds. It takes patience to come up with a good rasam which nicely balances the flavors of the dal and the spices, and in my case, the subtle flavor and aroma of the fruit being used.
Now Rasam comes from the sanskrit word Rasa meaning extract or essence, and Rasam is actually an extract of the Tuvar Dal. Rasam alongwith rice is typically eaten as the first course in the Iyer cuisine and is followed by Sambar and Rice as the second course. Yogurt with rice is the third course. Though popularly it is called Rasam thanks to the numerous South-Indian joints, down south it goes by many names in different regions. In Karnataka it is called Saaru, Chaaru in Andhra Pradesh and Resa in Tulu Nadu (regions comprising of Dakshin Kannada, Udupi and Kasargod). Certain communities like the Iyengars call it Chaathamudhu and the Sourashtras (community of immigrants in Madurai) call it Pulichaar (Puli meaning tamarind and Chaar meaning Juice or essence). The Rasam is also the basis for the Mulligatawny soup. Mulligatawny is in reality an anglicized corruption of Milagutanni meaning pepper water ( Milagu meaning pepper and Tanni meaning water). Apart from the different names by which it is called, the recipes also differ in terms of the consistency of the extract and the use of ingredients.

Mango Rasam


Ingredients:
Red Gram Dal (Toor Dal, also called pigeon peas) - 100 gm
Raw Mangoes (you can also take regular mangoes that are sour) - 3
Turmeric powder - 1 tsp
Rasam Powder - 3 Tsp
Mustard Seeds - 2 Tsp
Red Chillies - 3
Green chillies - 3
Curry leaves - 6-7
Garlic - 4 pods
Asafoetida (Hing) - A pinch
Salt - To Taste
Oil (For tempering) - 2 Tblsp

Method:
1. Peel and slice the mangoes into small cubes.
2. Add the red gram dal and water in a thick bottomed vessel. Cook on flame till it comes to a boil.
3. Add the mango pieces and salt. Simmer till mango pieces become tender and start to dissolve in the water.
4. If you do not have readymade Rasam powder, make your own rasam powder by roasting a tblsp of toor dal, 1/2 Tblsp cumin seeds, 1 Tblsp coriander seeds, 1 tsp peppercorns, 4 red chillies and a tsp of dried curry leaves. Grind them to a powder. (Iyengars also add in 1 tblp of fenugreek seeds and a tblsp of bengal gram).
5. Add this rasam powder alongwith turmeric powder to the vessel and boil for some more time.
6. Now prepare the tempering by heating oil in a separate pan. As the oil becomes hot, add in the mustard seeds. Also add in the asafoetida, red chillies, garlic pods, green chillies and curry leaves. fry for a little less than a minute. Remove from the flame and add this to the rasam (dal mixture).
7. Serve hot with rice.

Sunday, June 13, 2010

Shahi Paneer

Best Blogger Tips
It's raining outside as I write this post, and believe me, it feels good. The temperatures had been on a steady incline for the past 2 days and this afternoon it felt as if we were in for a tough week. Of late, rains preceded by a storm and lashing winds reminds of my visit to Palampur last month. The night before we were to leave, there was a huge windstorm, followed by rains and hail. In the wilderness with only trees and tea plantation around for miles, it can be a really scary experience watching nature's fury in full force.
A week after coming back from the vacations I had my in-laws over for the first weekend and since they are vegetarians, I got down to making the fool proof- always get rave reviews- shahi paneer. Now Shahi literally translated to English means Royal. Shahi dishes are meant to evoke a feeling of feeling royal, by having food using rich ingredients. This enrichment is usually provided by adding dried fruit or nuts or even dairy products like cream. Therefore, dishes having the shahi name are by nature very rich. The usage of rich ingredients like cashew, almonds, raisins or large quantities of cream in Indian dishes lends to the Shahi name being used. There are several variations of this dish available involving cauliflower, chicken, mutton, lamb, potatoes etc. and it is not uncommon to walk into a roadside eatery in India or the popular restaurant overseas and find this dish on the menu.

Other paneer recipes on this blog:
Paneer Moghlai Kofta in Palak Gravy
Paneer Ki Seekh
Achari Paneer Tikka
Kadhai Paneer
Qasar-E-Pukhtan
Paneer Makai

Shahi Paneer

Ingredients:
Paneer (Cottage Cheese), cut into 2" dices : 250 gm
Yogurt: 1/4 Cup
Milk : 1/2 Cup
Cashewnut, ground into paste: 1/4 Cup
Onions, finely chopped: 1/2 Cup
Ginger, finely chopped: 1 Tblsp
Green Chillies, chopped fine: 3
Tomatoes, chopped : 4
Green cardamom, crushed : 2
Coriander Powder : 1 Tsp
Red Chili Powder : 1 Tsp
Ghee : 3 Tsp
Salt: To Taste
Oil: For frying paneer
Coriander, chopped : 1 Tsp (For Garnish)
Cream, for garnish

Method:
1. Heat oil in a wok and fry paneer in it till it turns golden brown.
2. Drain and put in a bowl containing water.
3. Heat ghee in another wok.
4. Add onion and cook till it starts to turn light golden.
5. Add in the ginger and fry for 2 more minutes.
6. Add in the green chili and cardamom. Fry for a minute.
7. Add in the coriander powder and red chili powder. Fry for a minute.
8. Add in the tomatoes and cook for 6-7 minutes.
9. Add the beaten yogurt and cook for 5 more minutes.
10. Take off flame and cool.
11. Blend in a mixer till smooth.
12. Add the paste back to the wok and put back on flame.
13. As it comes to a boil, drain the paneer from the bowl of water and add the paneer pieces to the gravy.
14. Add milk and adjust consistency.
15. Add salt as per taste.
16. Serve hot garnished with chopped coriander and cream.

Monday, June 7, 2010

Lahori Aloo (Potatoes in Onion & Yogurt Gravy)

Best Blogger Tips
I have mentioned this before that my wife is a vegetarian and has a fondness for potatoes. Hence, I typically need to work overtime figuring out potato recipes to bring something different for her every now and then. This simple and evergreen recipe was just one of those tried in a hurry for her. You can find variations of the same being served in restaurants involving stuffing potatoes with a paneer (cottage cheese) filling or a moghlai version involving addition of a khus khus and/or cashew paste/coconut paste. I prefer the original version because it is simple to make and yet amazing to taste.

Lahori Aloo

Ingredients:
Baby Potatoes, peeled - 500 gm
Onion Paste - 2 Tblsp
Ginger Garlic Paste - 2 Tsp
Tomato Puree - 200 gm
Yogurt - 1/2 Cup
Turmeric Powder - 1 Tsp
Cumin Seeds - 1 Tsp
Coriander Powder - 3 Tsp
Red Chili Powder - 2 Tsp
Oil - 2 Tblsp
Salt - To Taste

Method:
1. Deep fry potatoes till almost done.
2. Heat oil in a pan and add cumin seeds.
3. As the cumin seeds start to crackle add in the onion paste. Fry till it starts to turn brown.
4. Add in the ginger garlic paste. Fry for 2 more minutes.
5. Mix the red chili powder, coriander powder and turmeric powder with a little water to form a paste. Add to the pan. Cook for 5 minutes.
6. Add in the tomato puree and cook till oil starts to separate.
7. Add in the yogurt and salt.Cook till a coating consistency gravy is formed.
8. Add in the potatoes. Cook till potatoes are done and the gravy has reduced to just coat the potatoes.
9. Garnish with chopped coriander leaves and serve hot with puris.

Thursday, June 3, 2010

Khumb Hariyali Kofta

Best Blogger Tips

Gastronome by Choice has finally gone live on twitter. It took me some time to get this going but now that this is out of the way...it feels good. You can follow it by clicking on
http://twitter.com/Gastronomeblog .
Lemme know what you think.
My nice and relaxing vacations have come to end and it is back to business as usual. I miss the lazy mornings spent relaxing at home, doing nothing, plain nothing ...except of course thinking about what can I cook. This kofta is exactly one of those thoughts put into practice.

Khumb Hariyali Kofta

Ingredients:

For the koftas:
Spinach, :750 Gm
Paneer (Cottage Cheese), grated and mashed : 300 Gm
Mushrooms, washed, drained and chopped: 160 Gm
Cumin seeds:1 Tsp
Garlic,finely chopped: 6 cloves
Ginger, finely chopped: 2 Tsp
Green chillies, finely chopped: 2
Lemon Juice: 1 Tblsp
White Pepper Powder: 1 Tsp
Black Pepper Powder: 1 Tsp
Cornflour: 2 Tblsp
Salt: To Taste
Oil: 2 Tblsp
Butter: 1 Tblsp
Brown Sugar: 2 Tblsp
Oil: For frying the koftas

For the gravy:
Ghee: 3 Tblsp
Onion Paste: 4 Tblsp
Ginger Paste:4 Tsp
Garlic Paste: 4 Tsp
Tomato Puree: 2 Cups
Cashew nut paste: 3 Tblsp
Clove Powder: 1/4 Tsp
Cinnamon Powder: 1/8 Tsp
Mace Powder: 1/8 Tsp
Red Chili Powder: 1 Tsp
Green Cardamom Powder: 1/2 Tsp
Black Cardamom Powder: 1/8 Tsp
Kasoori Methi: 1 Tsp
Cream: 1/4 Cup
Salt: To Taste

Method:
For the koftas:
1. Heat Oil in a kadhai (wok). Add in the cumin seeds. As they start to crackle, add in the garlic. Saute till light golden.
2. Add in the spinach and stir fry till all moisture has evaporated. Remove off flame and cool.
3. Once cool, chop the spinach roughly.
4. Heat butter in a separate wok. Add in the lemon juice and sugar. Cook till a nice syruppy consistency is achieved.
5. Add in the mushrooms, ginger and green chillies. Cook till done.
6. Mix in this mushroom mixture with the spinach and add in all remaining ingredients. Mix well.
7. Divide into 12 equal portions. Make round balls and keep aside.
8. Heat oil for deep frying the koftas.
9. When oil is hot, add in the spinach-paneer-mushroom balls and deep fry over medium heat till light golden. Remove and drain excess oil on absorbent paper.

For Gravy:
10. Heat ghee in a pan. Add in the onion paste and cook for 3-5 minutes on medium flame.
11. Add in the ginger and garlic pastes. Cook till mixture starts to turn brown.
12. Add in the tomato puree, red chili powder and cashew nut paste. Stir to mix well. Cook for 5 more minutes.
13. Add in the clove, mace, green cardamom, black cardamom and cinnamon powders. Stir. Cook till gravy is slightly reduced and done.
14. Crush and add in the kasoori methi. Cook for another 2 minutes.
15. Stir in the cream and adjust the seasoning.
To Serve:
16. Arrange the koftas in individual plates on a bed of the tomato-cashew gravy. You can garnish with almond slivers.

 
Design by Free WordPress Themes | Bloggerized by Lasantha - Premium Blogger Themes | Laundry Detergent Coupons